How to Watermark Your Images with Adobe Lightroom
Classic

Note: Adobe Lightroom Classic is now known as Lightroom Classic.
Ever see a ‘signature' or logo on a photo that identifies the photographer of the image? That's a watermark!
A watermark is a digital signature (or logo) that identifies you as the creator of an image.
Watermarks are important for two reasons:
- They send a message that people need to ask permission before using your images.
- They are a way to stand out on social media and get recognition as a photographer.
Here is an example of a watermarked image from back when my wife and I used to shoot weddings!

Sharing your watermarked images on social media is such an easy way to get noticed by potential clients. So make sure any image you post to Facebook, Instagram, etc. has your watermark added to it!
If you use Adobe Lightroom (and you should!) adding a watermark to your images is a simple process.
In this tutorial, I'll walk you through the easy steps to watermark your images with Lightroom.
Adding a Watermark with Lightroom Classic
The following video excerpt from my course Lightroom 101 shows you just how easy watermarking your images in Lightroom really is!
Now that you've watched the watermarking video, here are the step-by-step instructions to watermark your images with Adobe Lightroom.
Two Watermark Types to Choose From
If you want to watermark your images in Lightroom, there are two options for you to choose from:
- A text-based watermark
- A graphic logo watermark
If you want to watermark with a custom logo, but you're not comfortable with creating graphics, I have one piece of advice. Hire a professional to create your logo for you (which is what I did.)
Your logo is the visible brand of your company, so make sure it's a logo you're proud to show off.
So let's get started adding a watermark to your images.
Option # 1
Create a Text-Based Watermark in Lightroom
Here are the easy steps to create your own text-based watermark inside Lightroom:
Step 1: Make sure that you’re in the ‘Library’ module.
Highlight the images you want to apply your watermark on.
Step 2: Go to ‘File’ settings
Save your export settings as JPEG, and sRGB. (Unless your printer requests something different, you shouldn’t have to touch this setting again.)
Resize your images if you wish at this time.
Next, go to ‘Watermarking.’
Leave this box unchecked or it will just take information from your metadata. Use the dropdown menu to navigate to ‘Edit Watermarks.’
Step 3: Choose your font and font color
Scroll down to the text options settings until you see the box below.
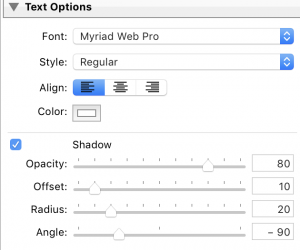 Font options for your watermark
I recommend that you make your font white (or another light, solid color for your font.)
White stands out but doesn't take away from your image.
Type in the text that you want on your watermark. (This can be your own name or a company name – whichever your preference is.)
Step 4 – Additional Font Options
Text Size: Make your font large enough to be noticed, but not so large it distracts from your image!
Optional: Change the opacity of your watermark to make it more transparent.
Add font decorations like drop shadows to your signature font if you like.
Step 5: Choose the anchor point for your watermark.
Scroll down to the ‘Watermark Effects' box. Notice the section marked ‘Anchor.
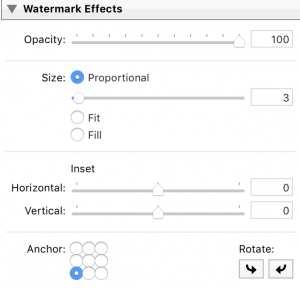 Choose your anchor
Anchor refers to the position your watermark is placed on your image.
There are nine possible locations to choose from. Simply click into one of the circles to select the correct placement for your watermark.
Take Care Where You Place Your Watermark!
I don't recommend that you place your watermark over the center of your image, for obvious reasons.
The main one is that it just looks bad!
The only reason you might want to choose the center position for your watermark is for sending proofs to clients.
The reason why you might choose to do this is that it's more difficult to crop out a watermark located in the center of an image.
(My own personal preference is to place my watermark on the bottom left of my images.)
Use the ‘Horizontal’ and ‘Vertical’ sliders to fine-tune the exact placement of your text.
Click ‘Save’ when you’re satisfied with your watermark text and placement.
Step 6: Export your photos
You’ll see your watermark added to all the images you chose in the first step.
Next, let's look at how to add a graphic watermark to your photos.
Option # 2
Add a Graphic Watermark to Your Images with Lightroom
This section of the tutorial doesn't cover creating a graphics-based logo with a program like Illustrator or Photoshop.
If you're experienced with graphics programs, then, by all means, get creative!
You might want to do a bit of Googling to find some ideas before you start – but remember to keep it simple.
You want to get noticed for your great photos more than you want to get noticed for just your logo!
If you're not comfortable creating a graphic watermark on your own, I recommend you check out my friends at Photologo.com.
They’ll create an awesome logo for your photography brand at a great price.
So, with that bit over with, let's get started with how to upload your graphics-based watermark to Lightroom.
Step 1: Create a folder inside your external hard drive called ‘Watermarks.”
Have your pre-made logo ready.
Upload your graphic watermark to this folder.
Step 2: Open up the ‘Library' module inside Lightroom
Select the images that you'd like to watermark.
Step 3: Click on ‘Lightroom’ and scroll down to ‘Edit Watermarks.’
Choose ‘Graphic’ as your watermark style by clicking the radio button.

Step 4: Click the ‘choose' button
Navigate to the folder where you saved your logo. Click on your logo to upload it to Lightroom.
Step 5: Select your anchor point
Follow the same method shown as for the text-based logo.
Adjust the horizontal and vertical offsets if you need to move your logo a bit.
Step 6: Save your watermark
When you export your images, your new logo watermark automatically appears on the images.
Now, your logo will be saved as a preset for the next time you export your image.
Note: You can save multiple text and image-based watermarks. Just select the one you want to apply before you export your images.
How easy was that?
If you'd like more Lightroom tips and tricks, be sure to check out my FREE Lightroom training, “The 5-Step Editing Recipe”
Want More Lightroom Tips & Tricks That Pro Photographers Use?
Be sure to join me on my FREE training, “The 5 Step Editing Recipe.“
Let me show you my deliciously simple recipe to better editing. In just 30 minutes, you'll discover how to speed up your editing workflow 10 X!


1 thought on “How to Watermark Your Images with Adobe Lightroom Classic”
I need to order a Lightroom classic, after I take pictures I want look good with out any watermarks.