- Total41
- Facebook14
- Pinterest15
- Email12

Capturing the perfect extreme close-up is every photographer’s aspiration, but there’s a fine art to making small objects look life-size or even larger. How do I focus? Can I capture effective macro photography with my iPhone? Should I use a special camera lens?
Whether you’re a novice or seasoned photographer, achieving a desirable result can be challenging. To help all macro photographers, we’ve compiled our top tips that answer these questions and more.
How To Focus For Success
One of the first steps to taking the best macro photograph is fine-tuning how to focus for that perfect shot. Focusing in macro photography isn’t an easy feat, but it’s a crucial one.
If your subject is four inches (10 centimeters) or larger, we suggest you focus like you usually would for a moving subject and use your continuous-servo autofocus (AF-C) with an autofocus area mode that easily tracks your subject across the frame. 3D tracking or dynamic area are both suitable.
When it comes to fast-moving subjects, it can prove more challenging to focus, even when using AF-C. However, we suggest using burst mode to take several photographs in a row. Since there may only be a fraction of a second where your image is perfectly focused, doing so will mean you won’t miss the moment.

Which Macro Photography Lens Should I Use?
If you want true macro magnification and sharp quality, we recommend investing in a special macro lens – a camera lens designed for photographing small subjects at very close distances.
They are an essential tool for any macro photographer’s kit, enabling you to focus much closer than regular lenses, fill the frame and capture the finer details. Professional opinion is pretty divided, with one camp suggesting a 50mm macro photography lens and the other preferring a 100mm lens, so we’ve compared the two.
The 50mm Macro Photography Lens
A 50mm lens is a great walk-around lens for capturing typical macro shots, but it does have some disadvantages. Some 50mm lenses are not suitable for macro photography. You'll want to find the ones that have a 1:1 ratio for those crisp, close-up macro shots.
The 100mm Macro Photography Lens
The 100mm lens offers a 1:1 ratio, meaning the object you photograph is life-size – ideal for extreme and flattering close-ups. This lens also allows you to shoot from twice the distance of a 50mm macro lens, which is rather handy when trying to capture a subject you could easily scare off.
Macro Photography With an iPhone
Suppose you’re starting out and haven’t got the budget for a professional camera. In that case, macro photography with an iPhone (or any phone) is a great option – and particularly useful when traveling and capturing on the go.
When using the default camera, you’ve probably noticed your iPhone takes its best photos from a distance of 3-4 inches. Anything closer than this and it seems to struggle to focus – but there is a hack.
The magnifying function in accessibility settings allows you to take sharp macro photography with an iPhone from a few inches away.

How to Take Macro Images With an iPhone
- Go to settings and select Accessibility to turn on the Magnifier tool. You can now add the magnifying glass to the control centre or home screen.
- Return to settings and control centre and scroll down until you see the Magnifier tool.
- Tap Magnifier and add it to the control centre.
- Open the control centre by swiping from the right corner of your phone screen.
- Select the magnifying glass icon. This will open the Magnifier tool. Aim your iPhone at the subject you’re photographing.
- Tap on the circle at the bottom of your phone to take a photo.
Take The Perfect Close-Up of Flowers
When capturing a still subject like a flower, we still recommend using continuous-servo autofocus because, while your subject might not be moving, you will be!
Despite your most strenuous efforts to stay still, it’s impossible to remain completely motionless while holding a camera. At such close distances, the slightest movement is bound to be detected. The good news is you can also use AF in manual mode – just remember to decide which part of the flower you want to be sharp.
Top tip: Live view can help you check if you’ve got your focus right.
If you’re using a tripod, precise focusing is much easier as it means you can fine-tune your composition. However, this isn’t always possible for low, ground-level flowers. In this instance, we usually lie flat on the ground and use our elbows for extra support.

Other Factors to Consider
Aside from the importance of focus, other factors such as light are also crucial for the macro photography of flowers.
To get the best lighting conditions for the perfect shot:
- Shoot on a bright or overcast day (clouds will diffuse the light and reduce shadows)
- Use a reflector on a sunny day to boost the light and eliminate shadows
- You may opt to carry a handheld LED camera light or ring light that mounts on the end of the lens to fill shadows or illuminate a bug down in the base of a flower.
Remember that using your camera’s widest aperture(low number) creates a small depth of field so one tiny slice of the photo will be in focus. The rest of the frame will be varying degrees of soft. A higher aperture will mean more of the frame is in focus yet you will need more light, either provided by your LED or by increasing the camera’s ISO. When shooting with a wide aperture it becomes even more critical to get certain details of your subject in focus, whether the eyes of a bug or water droplet on a flower petal.
Finally, don’t be afraid to do some creative cropping. Just make sure it looks intentional – cropping a couple of petals could easily look like a mishap!
Fun macro ideas
- Hasn’t rained in a week? Make your own water droplets for your flowers with a spray bottle.
- Try slicing fruit or vegetables thinly and light from underneath or above for some wild symmetry.
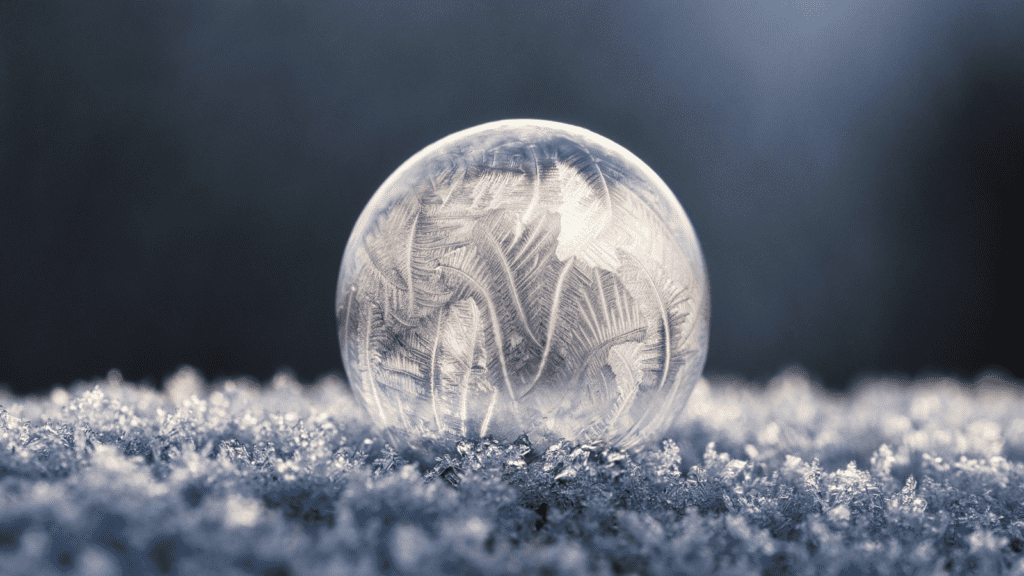
- Freezing outside? Ice creates some unique textures with occasional bubbles trapped inside.
- Use spare change to make a sea of coins that fill the frame. The detail can be amazing.
So, that’s all of our top tips on how to master the art of macro photography. Hone your skills, get your settings right, and you’ll be well on your way to capturing the detailed shot you’ve been dreaming of.
Happy macro-photographing!
- Total41
- Facebook14
- Pinterest15
- Email12


4 thoughts on “How to Master Macro Photography”
Great tips. I love macro photography but have never figured out how to get good macro or even close-up images on my phone. I can’t wait to try the magnifying function. Thanks.
Good luck! Let me know how it goes!
Great insight! Out I go to capture some new creations.
Thanks
You got this, Peter! Have fun!