- Total583
- Facebook335
- Pinterest246
- Email2
There it is again. The highlight clipping warning on your histogram is blinking.
No matter what you do, you just can’t seem to get rid of it!
It's particularly bad when you’re out on a bright sunny day by the water. The glare makes it just about impossible to get your autofocus to work.
It's just as frustrating when you try to photograph stunning architecture but the glare causes your camera to have a melt down trying to meter the light.
And when you get home from a day shooting outdoors, you’re disappointed because the sky is blown out in nearly every one of your photos. It's so bad that there’s no hope to recover it in post.
But there is good news. There is an inexpensive piece of gear that could be a total game changer for you.
Are you ready for truer, richer colors in your outdoor photos without blown out highlights?
Then say hello to the polarizing filter.
Sunglasses for Your Camera?
There is a good chance that you own a set of polarizing sunglasses. They help your eyes cope with glare when you’re driving or playing outdoor sports like skiing or tennis.
A polarizing filter is a lot like putting sunglasses on your lens – it helps eliminate the glare that makes it hard to focus and blows out the highlights from your photos.
But that's not the only benefits of a polarizing filter.
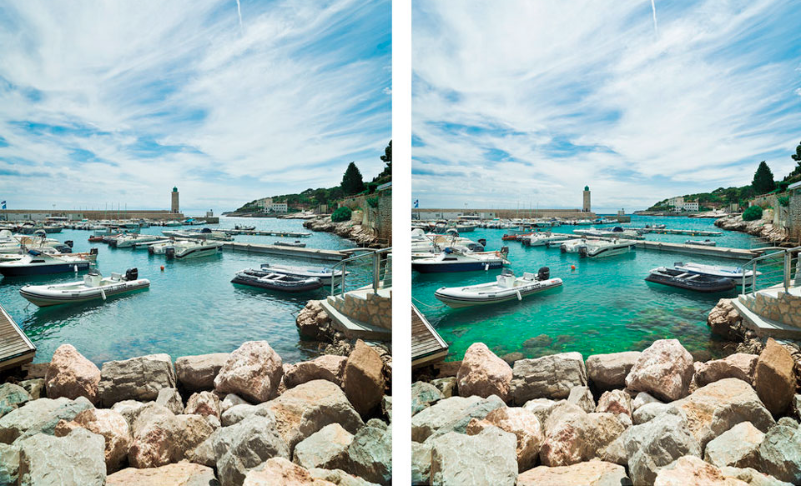
Not only will your colors look richer and truer with a polarizing lens, it even helps you see beneath the surface of water! Check out the photos below–before filter on is on left, with filter on the right.
Let’s look at what polarization is so you understand how adding a polarizing filter improves your photos.
What is Polarized Light?
This is a hugely simplified explanation of what polarized and unpolarized light is.
A physicist could explain it better, but be gentle on me – I'm just a photographer!
So here goes:
The light that reaches our eyes from the sun and artificial light sources contains electrical fields that move in different directions at the same time – up and down and side-to-side.
When these waves hit a smooth flat surface, they scatter in all different directions, causing glare.
So passing light through a polarizing filter makes the scattered light move in a single direction parallel to the object, which eliminates the glare.
Now let's look at when you should add a polarizing filter to your lens.
When Should You Use a Polarizing Filter?
You should add a polarizing filter to your lens anytime you’re out shooting in bright daylight, or around reflective surfaces like water or glass (or even sweaty skin!)
By cutting out the glare, a polarizing filter gives you truer colors and also increases contrast, to make your subject ‘pop! in your frame.
In particular, polarizing filters help create darker and more dramatic skies when you’re shooting landscapes, and at the same time, and helps controls your highlights so you don't blow out all the detail.
They work best when you’re turned 90 degrees from the sun. Polarizers won’t help at all if you’re shooting right into the sun because the light is just too overpowering.
Polarizing filters just aren't designed to block out 100% of light rays – just to reduce them.
Now, I've made out polarizing filters to be the best thing since sliced bread in this post.
But there are times when it's better to skip them!
When You Shouldn’t Use a Polarizing Filter
While landscape photographers benefit from a polarizing filter nearly all the time, you’re better off taking them off in low-light conditions because they reduce your exposure.
Because the polarizer reduces the light coming into your sensor by 1.5 – 2.5 stops, keeping it on in low-light doesn’t make sense.
So when the sun goes down, take your polarizing filter off your lens!
If, for some artistic reason, you want a shiny reflective look in your photos that’s another time you should remove your polarizing filter.
Want to capture a rainbow? Then take off your polarizer if you don't want that beautiful rainbow to disappear into thin air. A rainbow is reflected light – and the purpose of a polarizer is to neutralize reflected light!
Next, let's look at some sample photos taken with and without polarizing filters so you can see the difference for yourself.
Sample Photo with and without Polarizing Filter
You can really see a massive difference in the depth of color in the sky and grass in the photo below.
It almost looks Photoshopped, but it's all due to the magic of the polarizer.

Watch Your Exposure When You Use a Polarizing Filter
One thing to remember whenever you add a polarizing filter is that it reduces exposure by 1.5-2.5 times.
So that mean that you have to compensate by increasing shutter speed, ISO or shooting at a wider aperture to let in more light.
Notice in the photos below that the ISO doubled after adding the filter.
Before Polarizing Filter

Aperture: f8.0
ISO: 360
Shutter Speed: 1/60
After Polarizing Filter

Aperture: f8.0
ISO: 720
Shutter Speed: 1/60
The purple hue in the flowers is definitely deeper and more vibrant after applying the polarizing filter.
Now that you've seen a few examples, here's what you need to know before you purchase a polarizing filter.
Purchasing A Polarizing Filter
One of the most important things to know before you purchase a polarizing filter is the diameter of your lens.
Common lens sizes for DSLR cameras are 49mm, 52mm, 58mm, 62mm, 72mm, and 77mm. (Note: this number isn’t a reference to focal length.)
Nearly all lenses already have this information printed on them, but you may not know what you’re looking at.
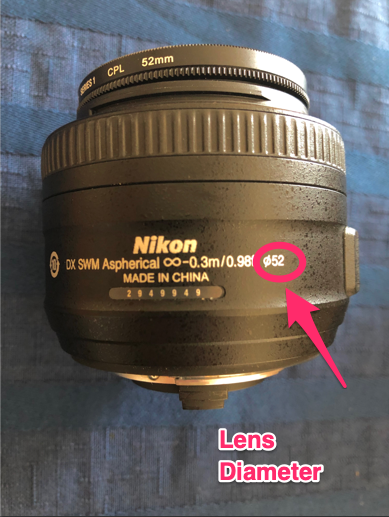
Manufacturers use the geometric symbol “⌀” to denote diameter. So when you see that symbol followed by a number, you’ll know what size of filter you need to order.
The image below shows where to find the diameter on a Nikkor 35mm f1.8 lens (you'll see diameter markings like this on your own lens.)

As you can also see in the image above, I have a 52mm CPL on my lens, which is the abbreviation for a circular polarizing filter.
What to Do if You Can't Find the Diameter of Your Lens
If for some reason you don’t have the lens diameter indicated on your lens, you can always break out a metric ruler in millimeters.
Measure the distance of the widest part of the lens from the inside rim of the threaded area to the inside rim on the other side of the lens.
Certain types of lenses, like very curved fisheyes that do not have filter threads, or telephotos with a very large front element aren’t suitable for polarizing filters.
In this case, you can check into Cokin filters, which attach to your lens with a holder that’s sold separately from the filter itself.
Want to Learn More About Specific Types of Filters?
I hope that you enjoyed this post about polarizing filters, but they aren't the only type of filter available to enhance your photos.
Our friends at B & H Photo have created an extensive article about various types of filters including polarizing, UV, and Neutral Density filters.
They know even more than I do about the construction, types and different brands of filters available.
So if you'd like to learn more on the topic, be sure to check out their super helpful article “A Guide to Filters for Lenses” to learn more on the topic.
While a polarizing filter can make a huge difference in the quality of your landscape photos, I have a few other tricks up my sleeve too!
To make an immediate improvement in your landscape photos, make sure that you check out the FREE landscape training below!
Join me for “The 3 Secrets to Amazing Landscapes”
Join me for a FREE landscape photography trainings session! I'll reveal my best secrets for creating landscapes with impact that win you ‘double-tap love' on Facebook and Instagram.
To register, simply click on the image below!
- Total583
- Facebook335
- Pinterest246
- Email2


10 thoughts on “Why You Need Polarizing Filters”
Great and clear explanation! Just in time for my cross country trip. Thanks, David.
You’re very welcome Marilyn! I hope you have a wonderful and safe trip! 🙂
Is there any way to handhold a filter on one of those cameras that turns itself off after while and the whole lens retracts into the camera and the cover closes. I have a Panasonic Lumix DMC ZS 100.
Also do all polarizing filters have 2 rings where you turn one ring until the best scene emerges.
Also can you use adapters to fit large diameter filter to small diameter lens. I have one to fit my canon and would like to use it on my Olympus if possible.
Hi Suzanne! I do believe there is a filter option for your camera. Check this out: https://www.amazon.com/Panasonic-DMC-ZS100-Multi-Coated-Multi-Threaded-Adapter/dp/B07BC4YJV2
You don’t typically have to turn the filter. You could try stepdown rings but they aren’t always recommended or work the greatest.
I hope that helps. Have a great day!
Are you metering TTL with the filter attached or are you metering first then attaching filter and adjusting for the loss of light manually.
Hi Sabrina! I would recommend metering with the filter attached. 🙂
I’ve been looking all over for the same thing Suzanne was looking for, but for a Canon SX740. Do they make one for it? Looking at the pictures for the one for Suzanne, they just don’t look like they’d work. Thanks for all the info
Hi Kendra! Check out this link and see if that’s what you’re looking for 🙂 https://www.amazon.com/Circular-Polarizer-Multicoated-Multithreaded-PowerShot/dp/B07JWHMXDP/ref=sr_1_3?keywords=polarizing+filters+for+Canon+SX740&qid=1573590724&s=electronics&sr=1-3
Great post i have one question is there an easy way to attach the filter its so fiddley and once its on the camera its a nightmare to get off many thanks
Hi Matt! I would make sure that you have the proper size filter for your lens because they should screw on and off rather easily 🙂