
Capturing a gorgeous sunrise or sunset photo is on every photographer’s bucket list.
Yet, jaw-dropping sunrise or sunset photos take more preparation than just throwing your camera in AUTO mode and pointing it at the sun.
Even beginners can master sunrise/sunset photography with the helpful tips to follow.
Sunrise or Sunset?
How do you choose between sunrise and sunset photos?
There is a difference!
Sunrise has more blue tones because it’s cooler at that time of day.
The result is softer, pinker tones instead of the vivid oranges and yellows we see at sunset.
For example, there are a lot of blue tones present in the sunrise photo below.

Compare the cool tones in sunrise image the to the warm, reds, oranges, and yellows in this silhouette image of my wife and boys at sunset.

Your location could look far different at sunrise than at sunset, so keep that in mind.
Equipment for a Successful Sunset/Sunrise Session
Let’s look at specific equipment for a successful sunrise/sunset session.
There is nothing too outlandish on the list. If you do a lot of landscape photography, you probably own quite a few of these items already.
A few items on the list are optional, but nice to have.
Lenses
Choose a wide-angle lens, because you’ll want to capture a big chunk of gorgeous sky in your photo.
For crop sensor cameras, choose a lens with a focal distance of 25mm or less. For full-frame cameras, select a 40mm or under lens.
A zoom lens that shoots this wide is fine.
Because sunrise/sunset are low-light conditions, it's ideal to have a lens with a maximum aperture of f2.8 or less as well.
Tripod
For best results, shoot with your camera on a tripod. You need a tripod because in low-light conditions, you'll need to leave your shutter open longer. And anytime you shoot at a shutter speed slower than 1/60″, it's almost certain that you'll introduce camera shake.
While your camera is mounted on a tripod, follow best practices such as turning off image stabilization/vibration reduction, and locking up your mirror before you take the shot.
I've written a post about shooting on a tripod you can check out here if you need a refresher.
Optional: When your camera is on a tripod, it's best not to press the shutter button manually, because that can introduce camera shake too.
Canon and Nikon both have apps to control your camera via WiFi. Consult your camera manual to see if your model is WiFi compatible.
If not, you can purchase an inexpensive remote shutter release that's compatible with your camera.
Using your camera's self-timer is yet another option for a shutter release that won't jar your camera.
Optional: Graduated Neutral Density Filter
A graduated neutral density filter guards against overexposing the sky.
There are two types of these filters.
The first type are square filters that mount to your camera via an external holder. They come in a set with different levels of darkening power.
Here's an example of a set of graduated neutral density filters from Lee Filters, a very popular brand.

LEE Filters Graduated Neutral Density Soft Filter Set 4 x 6″
To use a graduated ND filter, you line up your horizon with the section of the filter that transitions from light to dark.
Another option is a circular neutral density filter that fits on the end of your lens. Turning the filter increases the intensity of how much light is filtered. In general, circular neutral density filters are a little less expensive.
An additional benefit of the ND filter is you can leave your shutter open long enough in bright conditions to capture motion in water.
The long exposure below is a fine example of this.

Now that we've covered the equipment, let's get down to how to plan and execute your shoot.
Pre-Scout Your Location
If you can, always scout the location for your shoot ahead of time.
Ask yourself what’s around to create some foreground interest… maybe a building, or even an interesting tree or rock?
Avoid visual clutter in your shot. It’s always easier to shift around to keep an unsightly object out of your photo than to remove it later in post. If you can, find a spot off the beaten path.
Then you won’t have to dodge tourists and other photographers to capture your spectacular sunrise/sunset image!
Set Up Your Camera For Success
Sunrise and sunset are challenging lighting conditions, because the light changes so rapidly.
Making some adjustments to your camera settings helps ensure that you nail your shot even when the light changes by the minute.
Shoot in RAW Format
Shooting in .JPG mode provides fewer options to make adjustments in post-processing. For maximum editing flexibility, capture sunrise and sunsets with RAW file format.
I've outlined all the reasons to make the switch from .JPG to RAW files in this post.
If you want to share your photos while you're still out on your shoot, you always can set up your camera to shoot in RAW+JPG mode.
That way you can share .JPGs on the fly, because they are somewhat processed right in the camera.
Be sure to have extra memory cards on hand if you decide to go with the RAW+.JPG option, because using this format takes up more room on your cards.
Expose Manually
Don’t stick your camera in AUTO mode and pray for the best.
Take full control over your exposure by shooting in manual mode.
Use the camera setting guidelines below, but tweak them for your lighting conditions.
Aperture Settings
An aperture of f/11-f/16 is the optimal setting to get everything sharp in your image from front to back.
Just know that shooting at f/16 can create a sunburst effect because of the small aperture size.
Some people love this effect, but others hate it.
I just wanted to give you a head's up in case you're in the latter camp!
The photo below shows the lens flare and a sunburst effect from a small aperture.

If you want an artistic image with the foreground in focus and a blurred sunset sky, try a large aperture of f/2.8.

ISO
AUTO ISO works well in most conditions, but not so much for sunsets.
Start out at ISO 100 if conditions are bright.
If you need to compensate for lower light conditions, bump up your ISO to 200- 800. Don’t worry about introducing noise at these low-to-mid ISO levels.
Lightroom’s Noise Reduction module easily takes care of any noise introduced in this ISO range.
Shutter Speed
Adjust your shutter speed to create a correct exposure, according to aperture and ISO numbers.
Your shutter speed will be slow, in the neighborhood of 1/30” or less.
Remember that if you add a neutral density filter, your shutter speed slow more than this to let in enough light to create your exposure.
Metering
Choose spot metering mode to set the exposure.
Point the camera up at the sky, then set the aperture and shutter speed based on this reading. Then recompose your shot and take your photo.
Review the image and adjust the exposure if needed.
Never meter off of the sun itself. You’ll damage your eyes, and your camera cannot focus in the bright light.
Another tip for sunrise/sunset images is to turn on your histogram.
It will let you know if you're in danger of blowing out your highlights by flashing or even beeping.
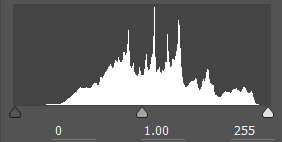
A Correctly Exposed Histogram.
If needed, add a stop or two of negative exposure compensation to control highlight clipping.
White Balance
AUTO white balance (WB) can create unrealistic tones in sunrise/sunsets, so avoid it.
To increase warm tones in your photo, switch from AUTO WB to Sunny or Cloudy white balance.
But don't sweat it if you forget to change this setting. You can easily adjust your white balance in Lightroom.
Auto Focus
Turn your autofocus off. Cameras struggle to autofocus during sunrise and sunset.
That's why it's better to manually focus your lens, with the autofocus turned off, and your focus distance set to infinity.
Your camera has an indicator in the viewfinder that lets you know when you’ve achieved focus.
Bracketing
Bracketing helps you capture more detail in the sky and in the foreground of your scene than you could otherwise achieve.
And the technique is ideal for sunrise/sunset photos where the sky is bright but the foreground is dark.
Here’s how to bracket your photos.
If your camera features built-in bracketing, set it up according to your camera manual.
But if your camera lacks this feature, you still can manually bracket your images. You'll need to take at least three images for successful bracketing.
The first photo in the series should be one-stop under-exposed. The second image should be properly exposed. Over-expose the last image in the series by one-stop. The idea is by blending the images together in post-processing, the underexposed image keeps more detail in the bright sky and the overexposed image opens up the shadows in the foreground. The correctly exposed image ensures that the midtones of the scene are perfectly captured.
It goes without saying that a tripod is a must for bracketing. You want the three images to look exactly the same, except for exposure. Handholding adds a bit of unwelcome camera shake that shows up in your blended image. So always use a tripod when bracketing to make sure there is zero movement.
To process, import your images into Lightroom. Select the bracketed images, and blend them together with Lightroom's HDR tool.
Using this bracketing technique retains more detail in your highlights and shadows than taking a single sunrise or sunset photo ever could.
Composition Tips for Sunrise/Sunset Images
Your composition will make or break your sunrise/sunset photos.
Avoid placing the sun in the center in your photo. It's a boring, overdone composition. It’s more interesting to place the sun to the left or right of center.
Another landscape rule is never to run the horizon in the centre of your photo, which visually cuts your image in two.
Use the Rule of Thirds for a more interesting composition.
If you want to include the sun in the photo, capture it at a low angle, just above the horizon (the light won’t be as intense.)
Above all, take lots of photos!
If you use a zoom lens, vary your focal lengths throughout your shoot.
Or if you’re shooting with a prime lens, be sure to move around and shoot both from close up and from a distance.
Last Tip for Spectacular Sunrise/Sunset Photos
Fast-changing conditions transform the look of your scene in seconds, so don't be quick to pack up your camera.
Also, keep shooting after sun sinks below the horizon. (Or just before it crosses the horizon in the the case of a sunrise.)
Often that’s when you’ll see the most spectacular colors of all!
Get More Landscape Photography Tips
Landscape photography and editing are challenging!
Would you like to skip the steep learning curve and start taking amazing landscape photos right away…the same kind that win lots of attention on Facebook and Instagram?
Then join me for my FREE landscape training!


25 thoughts on “How to Capture Incredible Sunrise/Sunset Photos”
Wow thank yiu so much. These tips are great.
Great piece on sunsets and great ideas to do and to do. Thanks David!
Awesome. Great ideas and I appreciate you sharing!
Great tips. There is so much I need to learn. Hoping to find time to do so. Thank you David.
Thanks for all of your helpful hints. They are greatly appreciated.
Great piece on sunsets and great ideas to do and not to do. Thanks David!
These are Great tips David! Thank you so much for all you do to help us learn more about Photography
I made the mistake of putting my ISO over 1200 thinking I would capture more light. Camera struggled with that. I was not sure where to focus. This was a very helpful article. Thank you.
This is very interesting because I’m Kinda having trouble with my camera
This was so helpful, I did a sunset shoot last night and this world have been wonderful to have!
Take 2!
Thanks for the help. I still need a lot more..but don’t..
Great info!
Thank you! Helpful tips.
Great tips. Thank you!
Thanks for sharing this! I always wondered the difference between sunset and sunrise pics and how to tell which is which!
Thanks David this is so helpful especially because I do a lot of Landscape photography and sunsets are a particular favourite!
Great tips. Just bought another retreat on the water in FL. the tips will really come in handy.
I was shooting the Milky Way a couple of weeks ago and it was suggested by the professional photographer you should have the mirror lock in the the up position to avoid any chance of camera shake.
Terrific tutorial, David – I really appreciate the links to the other resources as well!
Thank you very much ?
Thank you, great info which I will so refer to, and so very helpful!
I can’t wait to try this,thank you
My pleasure Diana! I hope it helps!
Wow that’s a lot! I have a couple weeks to practice and and maybe get a good one! Thanks for all the tips n tricks!
You are so welcome, Stacy! Good Luck!