
Update – As of October 2019, Lightroom CC is now known as ‘Lightroom.'
Which one is right for you – Lightroom Classic or Lightroom?
Well, a lot depends on how you like to store and share your photos.
Lightroom started off as a desktop cataloging and editing program that premiered in 2007.
When Adobe moved their photography software to a subscription-based model, the program was rebranded as Lightroom Classic.
Lightroom Classic is still in existence today as a superb desktop editing and cataloging program. (This version is also my own personal choice, for reasons I'll get into later in this article.)
In 2017, Adobe released Lightroom CC (now known as ‘Lightroom') , a cloud-based program aimed at photographers who want a simple way to sync their photos and edit across multiple devices.
Lightroom is the perfect choice for editing and sharing photos on the go. If you like to share your photos on social media, Lightroom makes it easy.
Both of the Lightroom programs are available (along with Photoshop CC) as part of Adobe’s Photography Plan that starts at $9.99/month.
While the two versions of Lightroom have many similarities, there are also some key differences.
First up – let's have a closer look at Lightroom Classic.
Lightroom Classic – Desktop Editing & Local File Storage
 One of the most important differences between the versions is that Lightroom Classic stores files on your local machine instead of in the cloud like Lightroom CC does.
In terms of file and management and organization, Lightroom Classic wins hands down over Lightroom.
With Lightroom Classic, there are so many ways to manage your photos.
They can be organized into multiple photo catalogues, added to specific Collections and Smart Collections, and tagged by color, flags and star-ratings.
Another amazing feature of Lightroom Classic is the ability to assign keywords to specific photos. It's a huge help to locate a specific photo at a later date.
I keyword my photos using a system of dates and client names that lets me quickly locate any photo in just seconds – even if the photo I’m searching for was captured years ago.
Let's look more in-depth at how the Catalog and Collection features work inside Lightroom Classic.
The Lightroom Classic Catalog System
Lightroom Classic's Catalog is a database that stores information about the location of your photo and any also any attached information, such as keywords, and your edit history. (You even set up multiple Catalogs if you choose.)
Individual photos inside the Catalog can be moved into a Collection of your choosing.
Collections group photos together without having to create multiple copies of the same image. (When a photo is added to a Collection, it isn't physically moved from its original file location.)
You can also set up Lightroom Classic Smart Collection feature to automatically sort your photos into Collections based on rules you define.
For example, you could automatically move all photos tagged with a specific keyword into a Smart Collection.
To streamline your workflow, you can set up Lightroom Classic to automatically add Presets, adjust metadata, add keywords and then add photos to a specific Collection on photo import.
Lastly, you can also create Quick Collections, which are temporary folders set for certain tasks. Quick Collections allow you to gather a group of photos for editing or exporting without moving them from their original location.
Next up – let's look at a few of the editing tools available only in Lightroom Classic.
Range Masking in Lightroom Classic
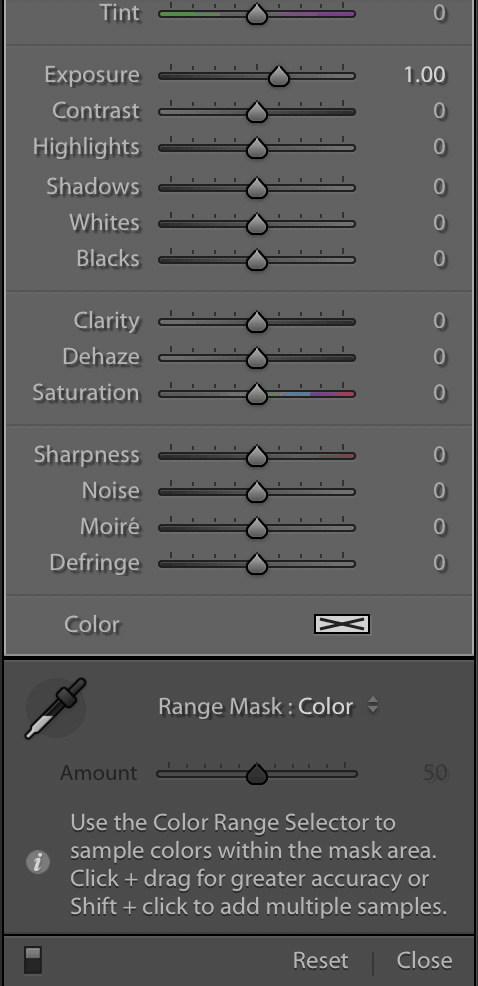 Until recently, the biggest issue with Lightroom's graduated and radial filters was that there was no way to mask areas you didn’t want to be affected by these tools.
In a recent update, Lightroom Classic has finally addressed this problem by introducing Range Masks.
Range masks are similar to luminosity masks in Photoshop. The Range Mask allows you to apply radial and graduated filters to certain areas of your photo without affecting surrounding areas.
While a Range Mask isn't a perfect replacement for Photoshop's masking tools, it is a huge improvement overall.
Here's an example of how you would use a Range Mask to adjust an overexposed sky.
Apply a graduated filter, then apply a luminance range mask to mask buildings or trees that appear in the same photograph.
Or if after applying the graduated filter, you see that the sky has different tones of blue, you could correct this with a color range mask.
Lightroom Classic also has another tool that isn't currently available in Lightroom CC – the Red Eye Tool(s.)
How to Fix Red Eye In Lightroom Classic
Red-eye occurs when the flash reflects off a structure located behind the retina of the eye. This reflection gets captured in your image and isn't anyone's best look!
Fortunately, there is an easy fix for this issue in Lightroom Classic – the red-eye tool. In fact, there are not one, but two red-eye tools in Lightroom Classic.
To correct red eye, go to the Develop module and select the Red Eye Tool.
Choose Red Eye or Pet Eye.
Starting at the center of the eye, draw a circle over the eye.
Adjust the available settings until you're satisfied.
Click ‘Done.'
Super simple, super effective!
Note: There is no corresponding Red Eye tool in Lightroom CC.
Lens Corrections in Lightroom Classic
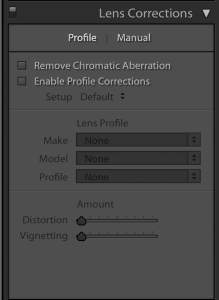 Lightroom Classic editing tools contain a lens correction tab to combat distortion, chromatic aberration and vignetting.
Corrections are made according to the profile of the lens used to capture your image. This is really helpful if you shoot landscapes where wide angle lenses cause a lot of distortion.
You can choose to apply the lens corrections manually or automatically.
The lens correction tool also helps reduce chromatic aberration. This shows up as purple fringing on the edges of your image. Chromatic aberration is often seen surrounding the leaves of a tree shot against a bright sky, and also around the edges of buildings and other objects.
You can also make simple lens corrections in Lightroom CC, which you'll find located below the ‘Optics’ tab. These adjustments are not based on a particular lens model as is the case in Lightroom Classic.
Adding Plugins to Lightroom Classic
While Lightroom Classic and Lightroom CC share many of the same basic editing tools, Lightroom Classic also supports plugins
These plugins add increased functionality to Lightroom’s standard editing tools.
Some photographers use these plugins as a partial replacement for editing in Photoshop. (In general, these plugins are less complicated to use than Photoshop.)
A few of the plugins supported by Lightroom include:
- DXO Nik Software collection
- Luminar
- Topaz
- Athentech Perfectly Clear
- Skylum
That about wraps up this overview of the major features in Lightroom Classic. But there is something super important to always remember when you edit in Lightroom Classic…
Always Back Up Your Photos!

If there is anything you must remember about Lightroom Classic, it's that there is no automatic backup!
Every time you shut down the program, back up your Catalog to an external hard drive.
If anything ever happened to your computer, you'd also lose all the photos in your Lightroom Catalog since it sits on your computer's hard drive.
So play it safe and back up to an external hard drive! If you shoot for clients, I'd take the precaution of backing up to a second external hard drive as well.
External hard drives can and do fail, so you can't be too careful!
Now that we've had a look under the hood of Lightroom Classic, let's dive into Lightroom CC's features.
Lightroom – Cloud-Based Editing & Storage
![]() Lightroom is based entirely in the Cloud. It automatically syncs your photos across desktop, mobile and web. (You can also sync photos in Lightroom with a manual process. )
Lightroom is based entirely in the Cloud. It automatically syncs your photos across desktop, mobile and web. (You can also sync photos in Lightroom with a manual process. )
In general, Lightroom is more intuitive to use. It's ideal for the photographer who likes the freedom to edit and share when they're away from their laptop.
With Lightroom, full resolution copies of your photos reside in the Cloud. This means that you can work on your photos anytime, anywhere.
Your photos automatically save to the Cloud with Lightroom. There is no need to back up to an external hard-drive unless you choose.
Photo Management Inside Lightroom
The way photos are managed inside Lightroom is completely different than in Lightroom Classic.
 Lightroom’s version of Collections is called Albums.
Any photo can be dragged into an Album from the ‘My Photos’ panel on the left side of your editing screen.
From there, you can create Folders to further organize your Albums.
All photos are automatically backed up to Adobe’s cloud server on import.
While automatic cloud backup is a nice feature, it is also potentially risky if you work with client photos.
Is Storing Client Photos in the Cloud Safe?
If you have security concerns about storing your client photos in the Cloud, you have good reason to worry.
Back in 2014, there was a big hacking incident where celebrity photos were stolen from iCloud. So it's not like this has never happened before!
Whenever you use cloud storage, (iCloud, Dropbox, Google Drive, Adobe, etc). there is always a risk a hacker could access your photos.
Personally, that's a risk that I'd rather not take.
It's true that saving photos to multiple external hard drives instead of to the Cloud is a pain, but I’d rather be safe than sorry when it comes to my client work.
But if you’re looking for a simple way to back up and store your own images, then Lightroom may be a great solution for you.
As well as making back up painless, Lightroom automatically tags your photos on import to make your photo organization easier.
And it does this auto-tagging with the help of Adobe's own AI tool, Adobe Sensei.
Lightroom CC's Artificial Intelligence Tool
![]()
Lightroom has incorporated Adobe Sensei into its editing tools in several different ways.
I already mentioned the auto-tagging feature, but that's not all that Adobe Sensei can do.
While AUTO correct has long been a Lightroom tool, Adobe Sensei takes it one step further.
Lightroom's AUTO tool uses Adobe Sensei to analyzes your photos and make corrections based on cross-references to thousands of professional images.
While this could be helpful for photographers without a lot of editing experience, be aware that it also takes away any artistic vision you may have had for your photo!
Lastly, both versions of Lightroom incorporate Adobe Sensei's new ‘Enhance Detail.’
The Enhance Detail Tool
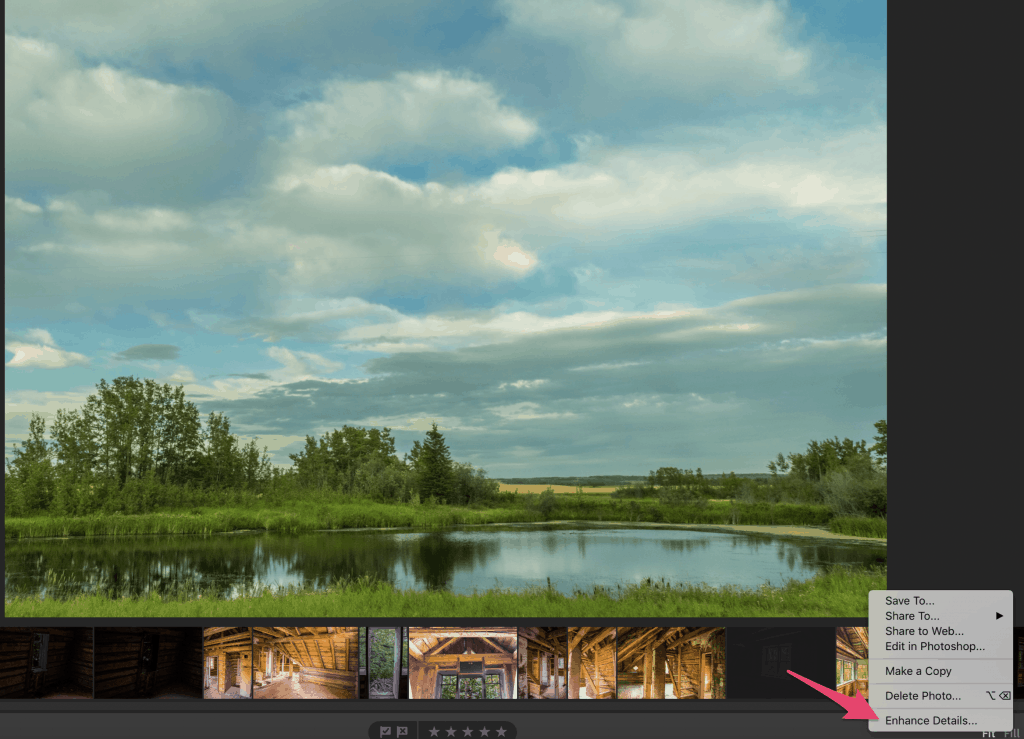
Tiny imperfections in your photos really stand out when you enlarge them to print. The Enhance Details tool helps refine your images before you print them.
One thing to note is that this tool only supports RAW files. (In other words, it doesn't work with JPG files.)
Enhance Detail processes RAW files with crisper detail, better color rendering, more accurate edge rendition while creating fewer file artifacts.
To access this feature, right-click on any RAW file and a dialogue box pops up. You’ll see the ‘Enhance Detail’ option listed at the bottom of the dialogue box.
Adobe Sensei then goes to work examining your photo on a pixel level and making corrections based on machine learning.
This tool is available for RAW image editing in both Lightroom Classic and Lightroom CC.
Wrap Up: Lightroom Classic vs. Lightroom

While both of these Adobe products are fantastic editing tools, they both have certain strengths and weaknesses.
Which one is right for you?
If you do any kind of paid work for clients (or intend on it in the near future), you stick with Lightroom Classic. It has a more sophisticated tool-set, and its cataloging and file management features are superior to Lightroom's.
On the other hand, if you like to edit on the go and share images on social media, then Lightroom could be a great fit for you.
While both versions of Lightroom are excellent, pick one version and stick with it! Don’t switch back and forth.
The programs don’t ‘talk’ to each other, so edits you do on one platform won't show up on the other.
Are You Ready to Master Lightroom?
Then check out my FREE ‘5 Step Editing Recipe' training! In just 30 minutes, you'll master the basics of editing in Lightroom.


4 thoughts on “Lightroom Classic vs. Lightroom CC”
I purchased several pre-sets and added them to Lightroom CC, before knowing the difference between the two. NOW I cannot find a way to add them to Lightroom Classic! Any suggestions? I would rather use the Classic version, but all the pretty presets are in CC!
Hi Jamie! Check out this blog post that I wrote! I think it may help 🙂 https://davidmolnar.com/import-lightroom-presets/
I had the hardest time trying to determine what version of Lr I had- Now I know, I have the Classic version. How do I know what update version I have? Also, my wife bought a new Sony A7III and LR won’t process the RAW files from that camera. Where can I go to get an update if that is available and have you heard when Adobe is going to put a fix in on this?
Hi Rich! To see what version of Lightroom Classic you’re using you can go to help > system info when in the program. If you have a subscription plan to Lightroom you can log into your Adobe Creative Cloud account and update the program if needed. Updating the program could help solve the issues with the RAW files but there is also a workaround in this video that may be helpful if updating the program doesn’t help: https://www.youtube.com/watch?v=g7Qjk9uDbIg
I hope that helps! Have a good one!