- Total104
- Facebook96
- Pinterest5
- Email3
Looking for a Lightroom on Mobile tutorial? You've come to the right place.
Lightroom on mobile not only is a great camera app but also one of the most powerful photography editing tools on the market. It’s a perfect solution for photographers who want more control over their smartphone camera – and also the ability to sync their photo collections to any device.
With Lightroom Mobile, you can edit on the go without being tied down to a desktop machine.
There are often times that need to do some quick edits before you get home. This is where Lightroom Mobile is a game-changer.
Maybe you’re a wedding photographer whose client asks you to post a few reception photos to social media. Or you’re a travel or landscape photographer who wants to share the beauty of your location with friends and family before you return home.
All of these situation are tailor-made for Lightroom Mobile.
The best news? The Lightroom Mobile app won’t cost you a penny. But there is a slight catch.
Free, With a Slight Catch
The Lightroom Mobile app is an extension of Lightroom CC, Adobe’s Cloud-based storage and editing suite. Nearly all of the features included in Lightroom CC are also available on the Lightroom mobile app.
For example, you can do all basic edits like exposure, white balance, contrast, highlights, shadows, cropping, sharpening, noise reduction etc.
But without a paid subscription to Adobe’s Photography Plan, you’ll miss out on the app’s most powerful features.
Adobe Photography Plan Inclusions
A subscription includes access to Lightroom Classic (the desktop version of Lightroom that has powerful cataloging features), Lightroom CC (the cloud-based version of Lightroom) and Photoshop CC (Photoshop in the cloud.)
While you can definitely use the Lightroom Mobile app without a subscription, you’ll miss out on some amazing features.
A Subscription Opens Up Access to Extra Lightroom Tools
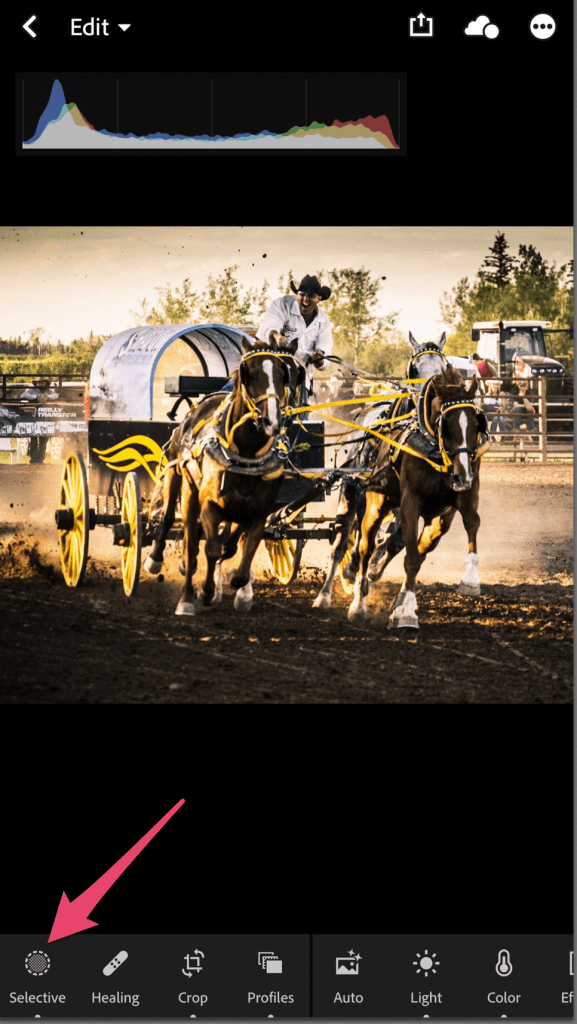 A paid subscription give you access to Lightroom Mobile’s Selective Edit tools (which allows you to make local edits.)
You also have access to other Adobe editing tools, such as Photoshop Mix, Photoshop Fix, Adobe Spark Page, Adobe Spark Video, and more.
Want to create an online portfolio of your best images? A subscription to Adobe’s Photography Plan gives you a free customizable website too.
But RAW file handling is what sets the paid version of Lightroom Mobile apart from the competition.
RAW Shooting and Editing on Lightroom Mobile
Have RAW photos that you haven't imported into Lightroom Albums yet that you’d like to edit on your device?
Then use the Lightning to SD card adapter for Apple devices, or an SD card reader for Android. After import, bring them into Lightroom Mobile and edit the same way you would if the photo was part of your Lightroom Albums.
If you’re concerned that RAW photos will take up a lot of storage on your phone, Adobe is one step ahead of you. They created Smart Previews to solve this issue.
Smart Previews on Lightroom CC/Mobile
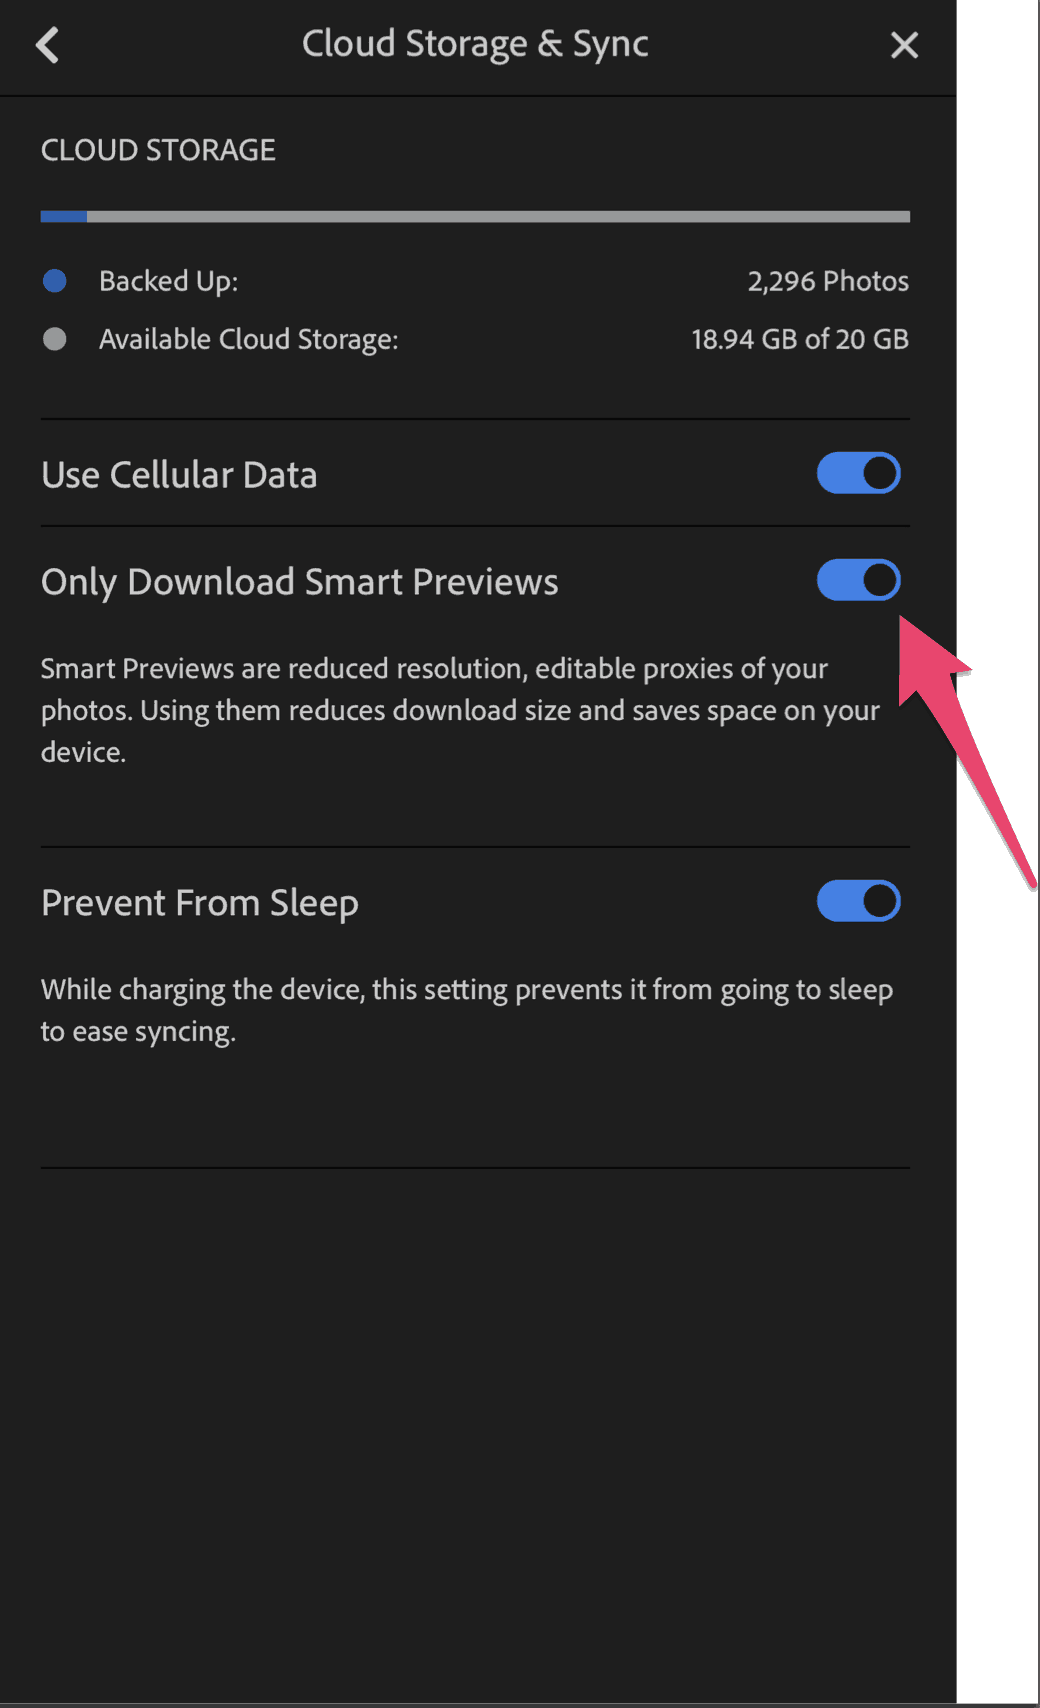 Surprisingly, huge RAW files sync’d over from Lightroom CC to Lightroom Mobile take up little storage space on your device if you saved them as Smart Previews. (This is the default import setting in Lightroom Mobile.)
According to Adobe, “Smart Previews in Lightroom Classic CC allow you to edit images that are not physically connected to your computer. Smart Preview files are a lightweight, smaller, file format, based on the lossy DNG file format.”
1 GB of photos only take up about 25-50 MB of storage when saved as Smart Previews or around 2% of the space needed to store RAW files.
If you want to avoid importing RAW files that aren’t Smart Previews due to storage constraints, you can choose that option in your settings under ‘Cloud Storage and Sync.’
But can Lightroom Mobile edit photos shot on your iPhone or Android? Sure it can, and even better, it’s an awesome camera app!
The camera options help you get it right to cut back your editing workflow.
Access Your Lightroom Presets and Profiles
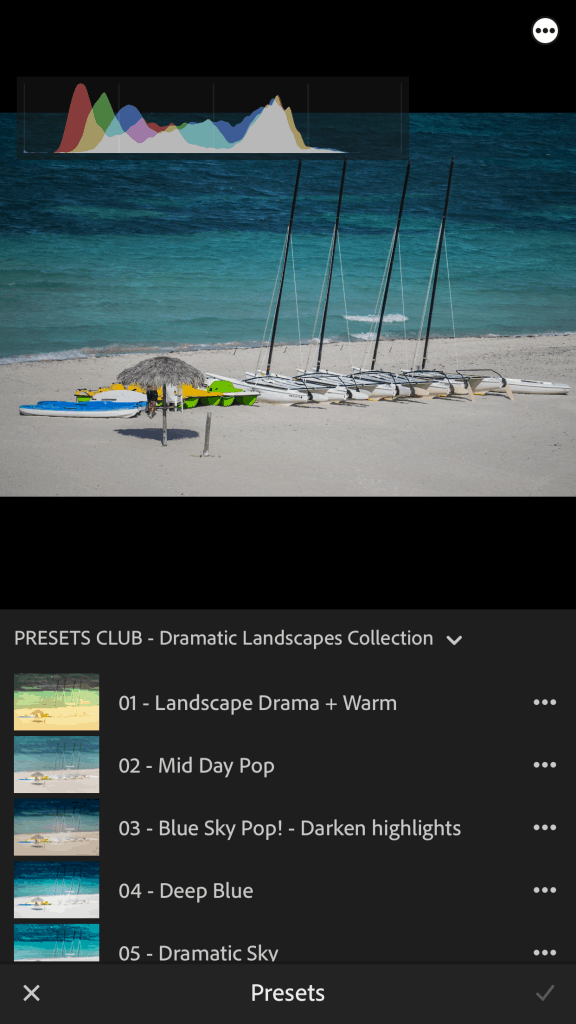 Any presets or profiles you uploaded to the desktop version of Lightroom will automatically sync to your Lightroom mobile app – without you having to lift a finger.
A common question I get is “Can I upload Lightroom Presets directly from my mobile app?”
The answer at this time is “No.”
The best workaround if you want to add Presets to your mobile device is to upload them on the desktop version of Lightroom, where they'll automatically sync to your mobile device.
At the present time, bulk editing by applying presets to entire Lightroom Albums is not yet a Lightroom Mobile feature.
The best you can do is apply presets in bulk in the Lightroom desktop app, then tweak them in Lightroom Mobile.
Using Lightroom Mobile as Your Camera App
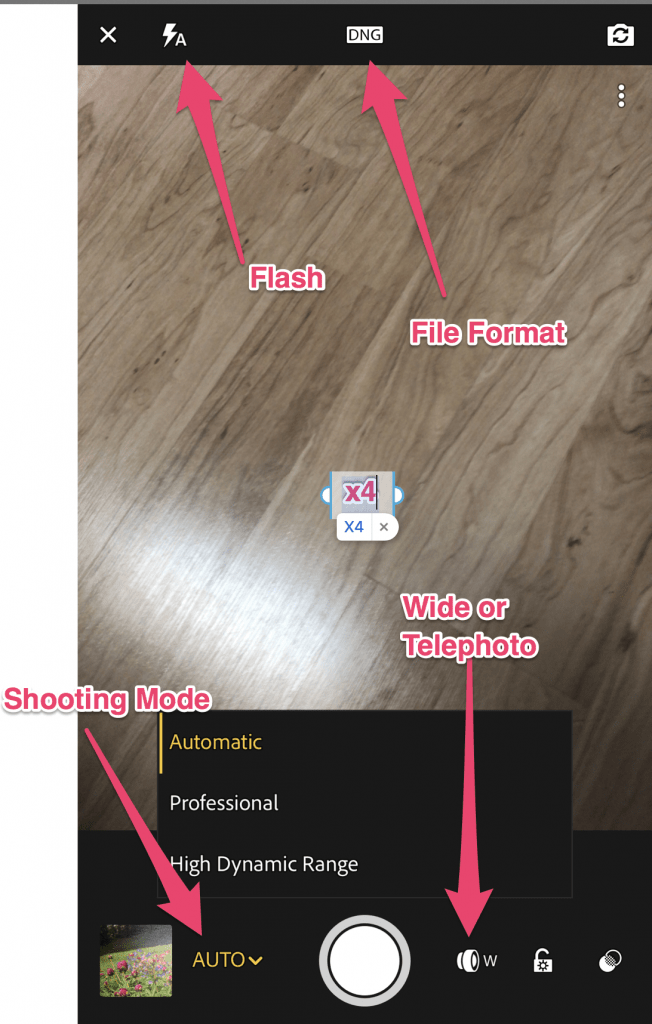 Now here’s where things really get fun! Lightroom Mobile is a full-featured camera app as well as a remarkable editing tool.
Access the camera by clicking on the camera icon located at the bottom right of your phone’s screen. Once the camera opens, click on the three dots on the top right of your screen.
On the top of your screen, you’ll see the flash options when you click on the Lightning icon. You can set your flash to AUTO, off or on. I recommend that you turn your flash off unless you’re in a specific situation that needs it.
Lightroom Mobile has three shooting modes: Automatic, Professional or HDR (High Dynamic Range.)
Naturally, Professional and HDR mode give you more options.
Automatic Shooting Mode Options
Adjust exposure by swiping left or right. Choose to shoot wide angle or telephone by toggling on the “T’ or “W” icon at the bottom of your screen. Lock exposure by clicking the lock icon or apply presets by clicking the two circles on the bottom right of your screen.
Set your preferred file format to DNG (smaller version of a RAW file) or JPG by clicking on the top of your screen. I recommend that you leave your format set to the default DNG.
Choose your aspect ratio, set a timer, or apply a grid or level by tapping the three dots at the top of the screen on the right hand side. The grid and level feature is a huge help to get your horizons straight.
Professional & HDR Shooting Mode Options
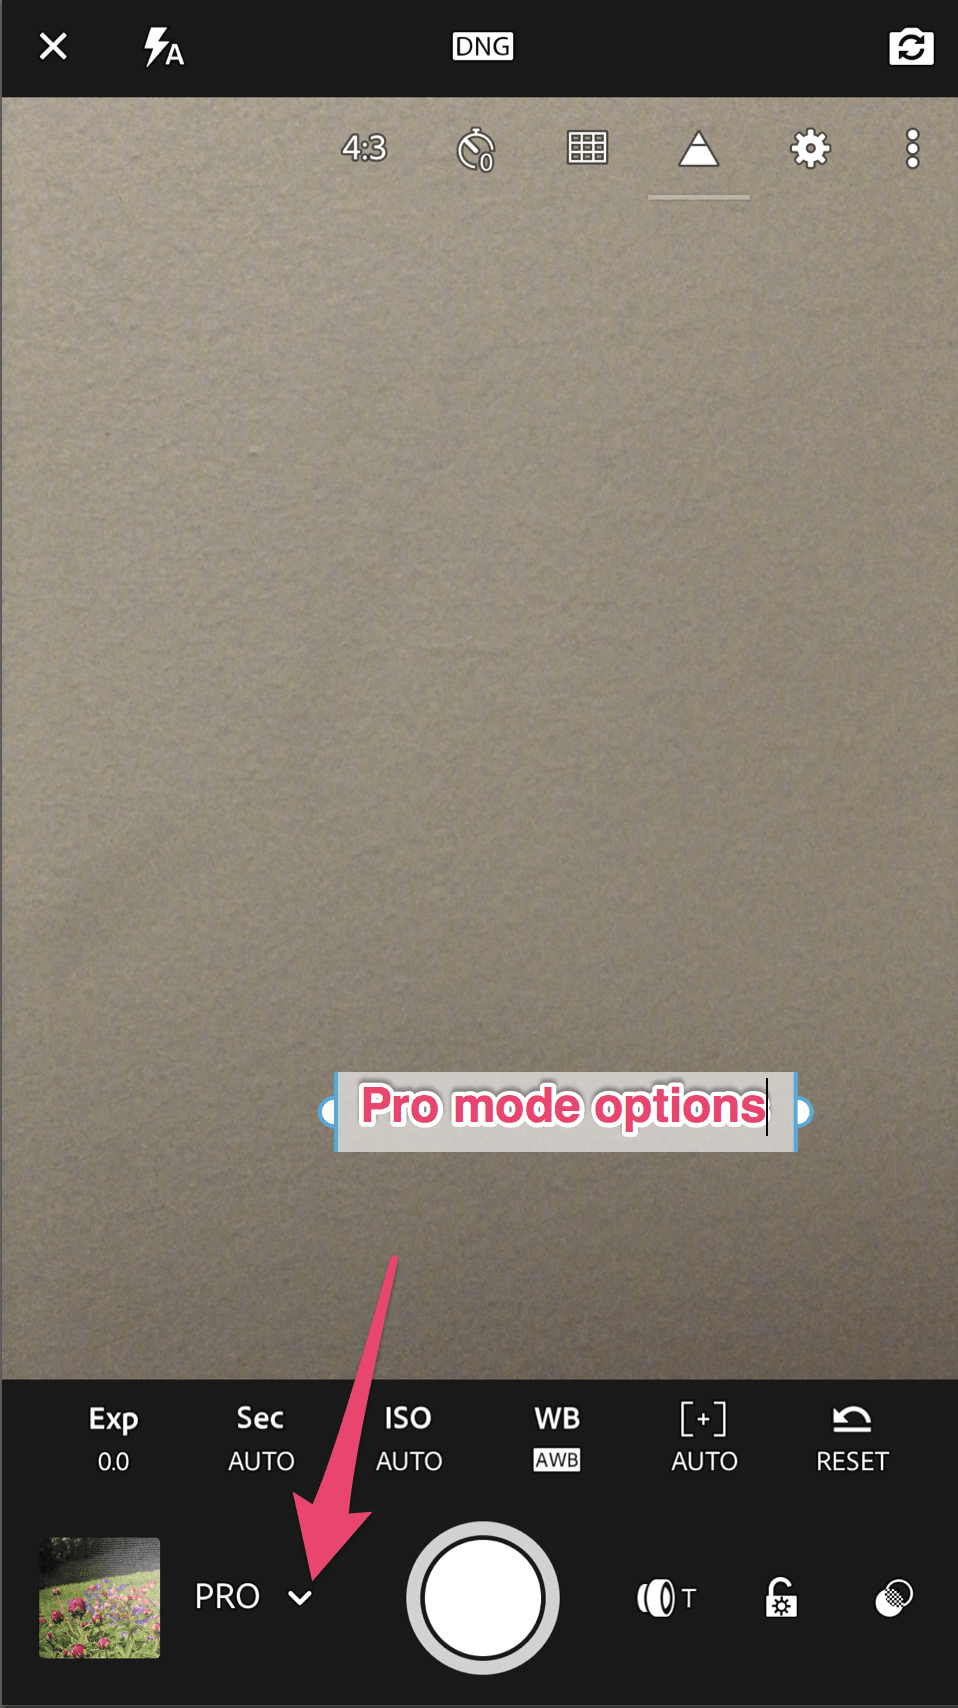 Along with the main options available in Automatic mode, professional mode allows you to adjust white balance, exposure, ISO, shutter speed for more control over your photo.
Usually, photographers have to decide whether to expose for the highlights or for the shadows and then fix the difference in post processing. That's where HDR mode can help bridge that gap between bright and dark.
Lightroom Mobile’s HDR mode automatically scans your scene to determine the correct exposure range and then captures three bracketed DNG files. Lightroom then merges the three files and tone maps then automatically.
Try HDR mode the next time you shoot a landscape or architecture photo with your phone and see the huge difference it makes!
Now that you know how to capture photos with Lightroom Mobile’s built-in camera feature, here’s what you need to know before you share your photos.
Lightroom Mobile Photo Sharing Options
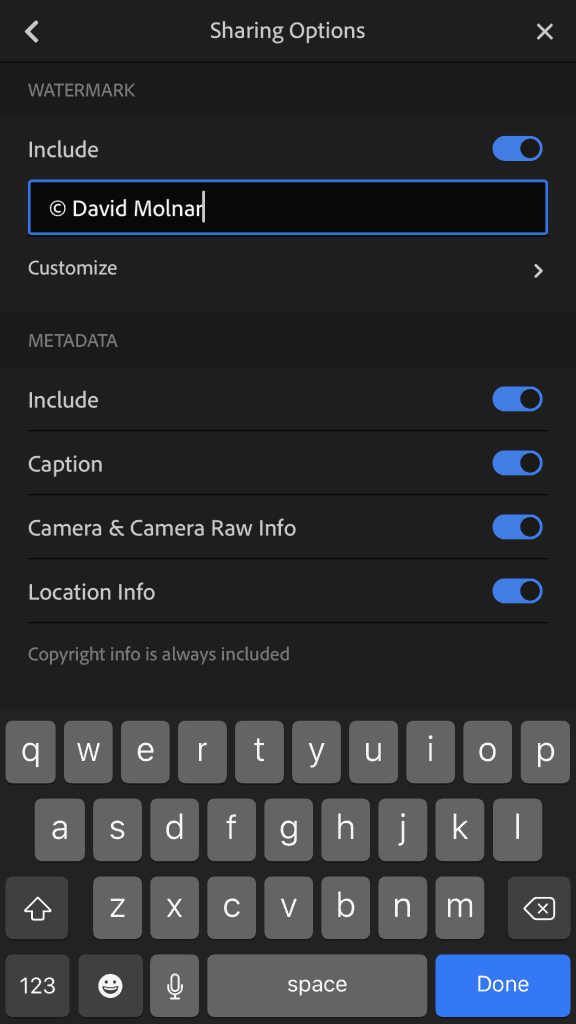 If you didn't apply a watermark when you sync’d your photos in Lightroom CC, you can still add a simple text watermark in Lightroom Mobile.
To apply a watermark, access the settings on the Lightroom Mobile homepage and choose “Sharing Options.”
Just as in the desktop version Lightroom , you can choose one of ten anchor points and select the text size, offset and opacity for your watermark.
As well as including a watermark, you can also choose to include the photos metadata, camera & Camera RAW info, as well as a caption and location information.
Try Lightroom Mobile for Yourself
Lightroom Mobile is an amazing tool for amateur and professional photographers alike. Download the free app and try out its many options today.
If you’d like some help editing your photos shot on Lightroom Mobile or even on your DSLR or mirrorless, check out my FREE training, “The 5 Step Editing Recipe.”
Editing is fun and easy with my Recipe, so why not join me for this workshop?
Sign up by clicking the image below!
- Total104
- Facebook96
- Pinterest5
- Email3

